
One Room Challenge: Week 3 | The Wallpaper & A Nightstand Conundrum

Welcome to Week 3 of the One Room Challenge! This week, I'm talking all about the installation of that fabulous floral wallpaper and thinking through how to fix up my vintage mid-century nightstands. Let's get into it!
(Psst! Need to get caught up on this series? I've got you covered! Here are the links to the other posts: Week 1, Week 2, and Week 4.)
Last week, I shared the design plan and floor plan for this little guest bedroom makeover, and provided a little bit of color commentary on all the pieces I've picked out. It was so fun to finally get to talk about the design I've been cooking up for the last couple of months. Woohoo!
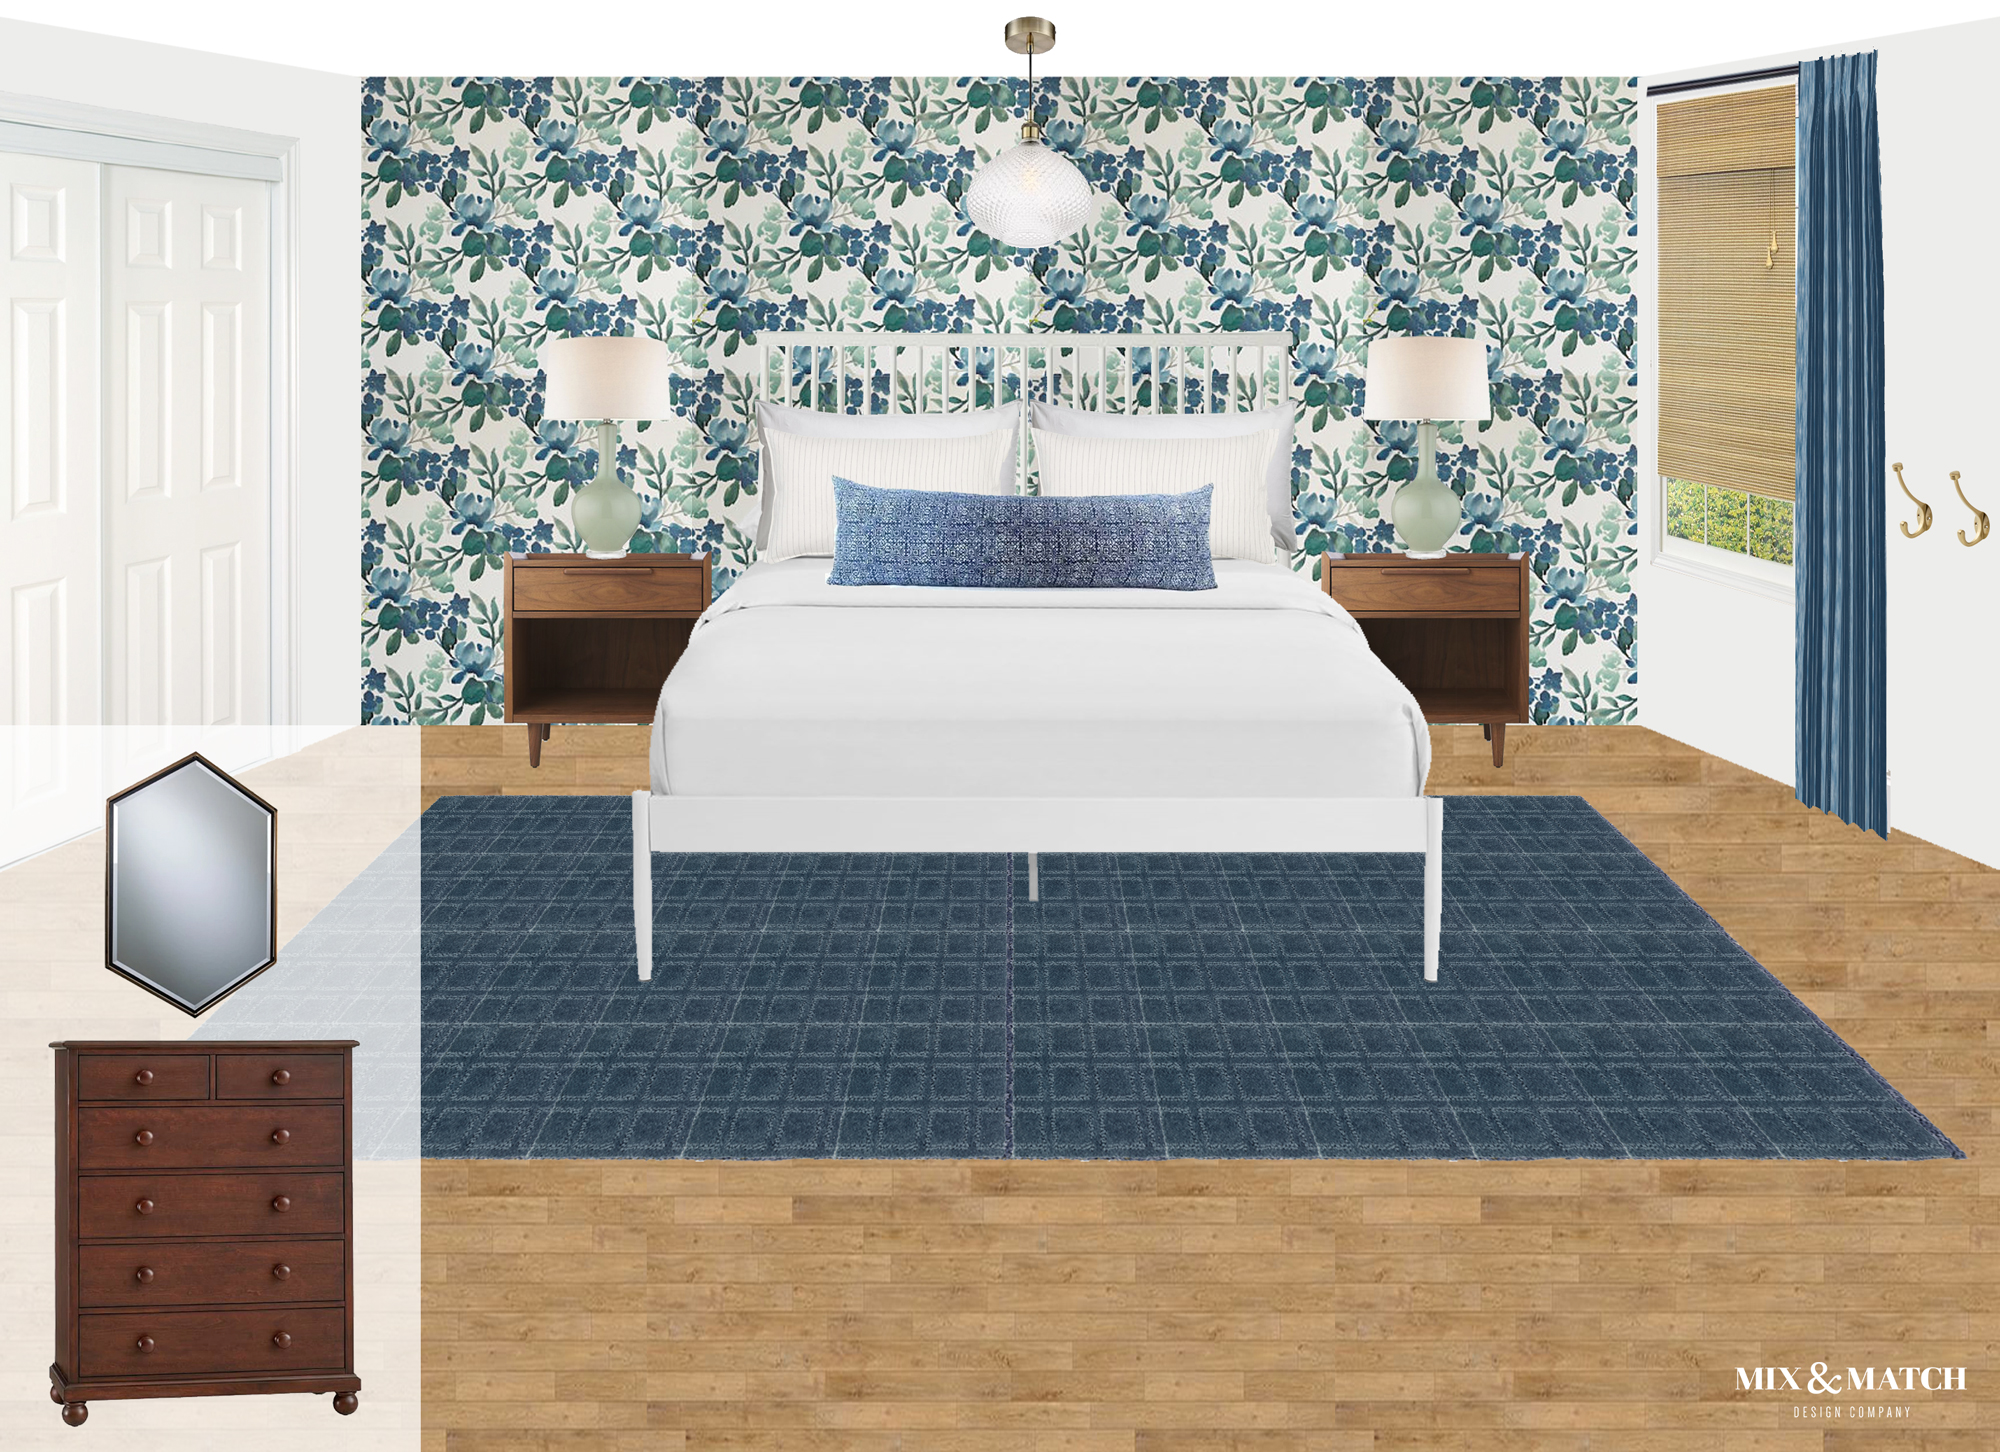
As a reminder, this is what I'm going for:
Y'all went crazy for the wallpaper that's going up behind the bed, and rightly so - it's stunning! If you've been following along in Instagram Stories, you got a peek at the end of last week as I was installing it, but I'm here to talk all about it today.
When I was planning this makeover, I knew I wanted to incorporate wallpaper and the natural place was to cover the wall behind the bed. I also knew I wanted to stretch myself creatively in this room, so I decided to go big and bold, and design the rest of the space around it. It would be a true statement wall that added a big wow factor!
As it turned out, I didn't have to go very far in my search for the perfect wallpaper! Here's the backstory: last fall I ran a series called Design In A Box here on the blog, and in one of the posts, I used the Deep Greens Floral paper from Sweet Pea Wall Design in a "floral chic" dining room I designed. That wallpaper stuck with me, and all these months later, when I plopped it into my Photoshop rendering of this room to see what it would look like, I knew it was the one. It was the perfect balance of fun, but sophisticated, and I loved the color scheme - the blue, green, and gray tones keep the floral from feeling too feminine. Finding this wallpaper was just what this room needed to help bring my modern farmhouse eclectic guest bedroom vision to life!
Here's the image from the shop listing:

via Sweet Pea Wall Design on Etsy
So I reached out to Emily, one of Sweet Pea's owners, to ask if she would be interested in collaborating with me on this project. Thankfully she said yes and sent six rolls of their awesome removable wallpaper my way. Thank you, Emily!
At this point, some of you may be asking, why removable wallpaper rather than traditional paste? Well, for one, I've always wanted to see what removable wallpaper was really like, and two, I wanted to be able to install it myself, and I didn't really want to learn an entirely new skill in order to hang traditional wallpaper. I figured I could handle a giant sticker! The fact that it's removable is nice too in case I want to take it down someday, but the truth is that traditional paste wallpaper is made to be strippable these days as well, so you don't have to fear the future removal process.
Last Thursday, I spent the afternoon installing it, and it really wasn't too bad! It was really about being precise and patient. I found that getting the first third of each roll lined up, hung, and smoothed down was the hardest part. Once that was set, the rest was a breeze. It took me about four hours from start to finish to install my six rolls.
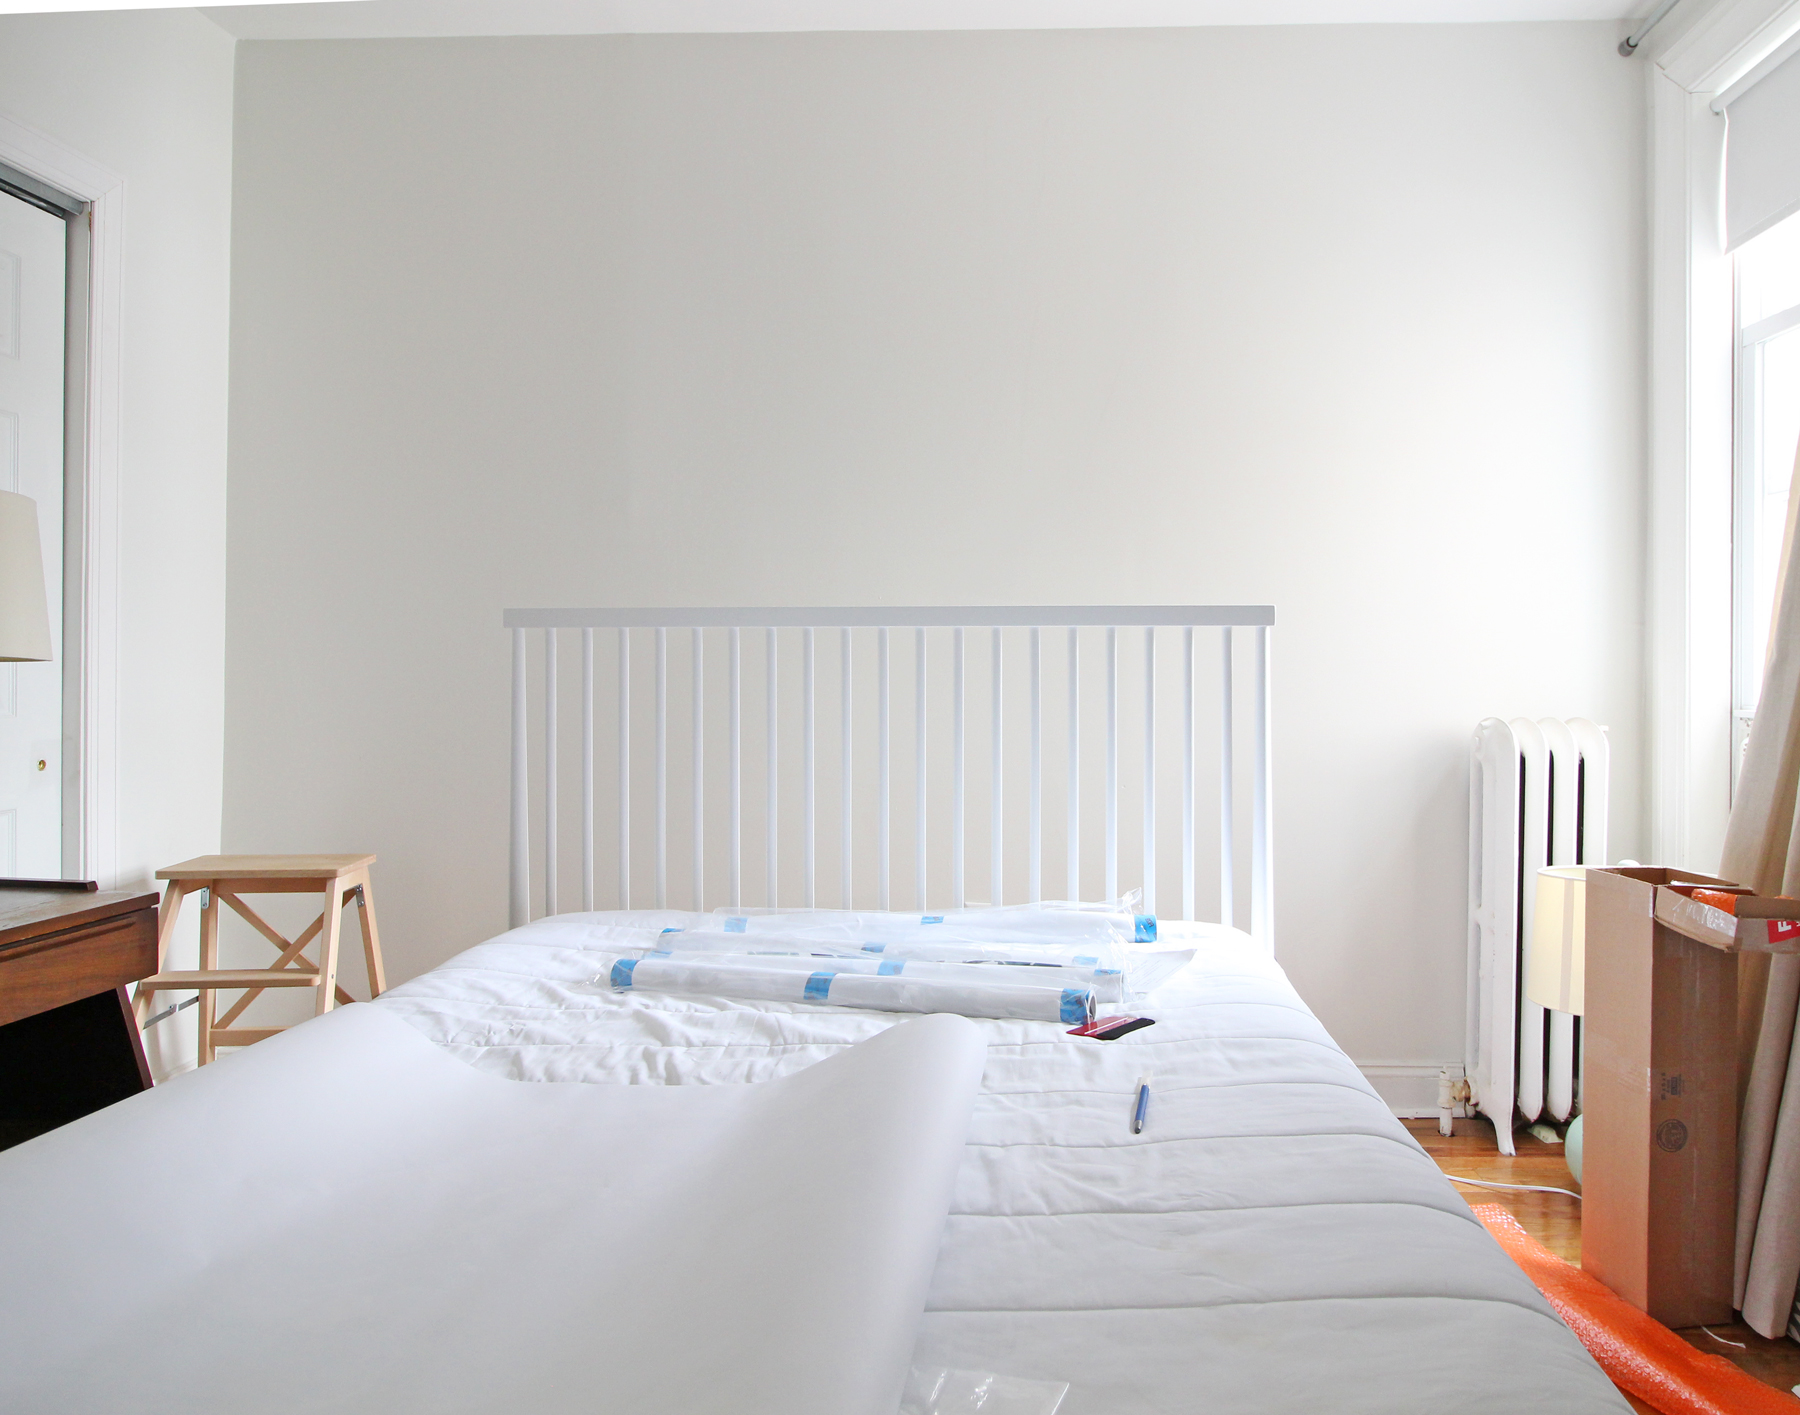
I thought it would be fun to share a little before and after to show you what a crazy impact wallpaper can have on a space. I also made a GIF of the process so you can see each roll going up! (P.S. Be sure to take note of the fact that the new modern farmhouse bed from Crate&kids is making its first appearance - it got delivered last week, and I love it.)
Here's the before:
And here's the after!
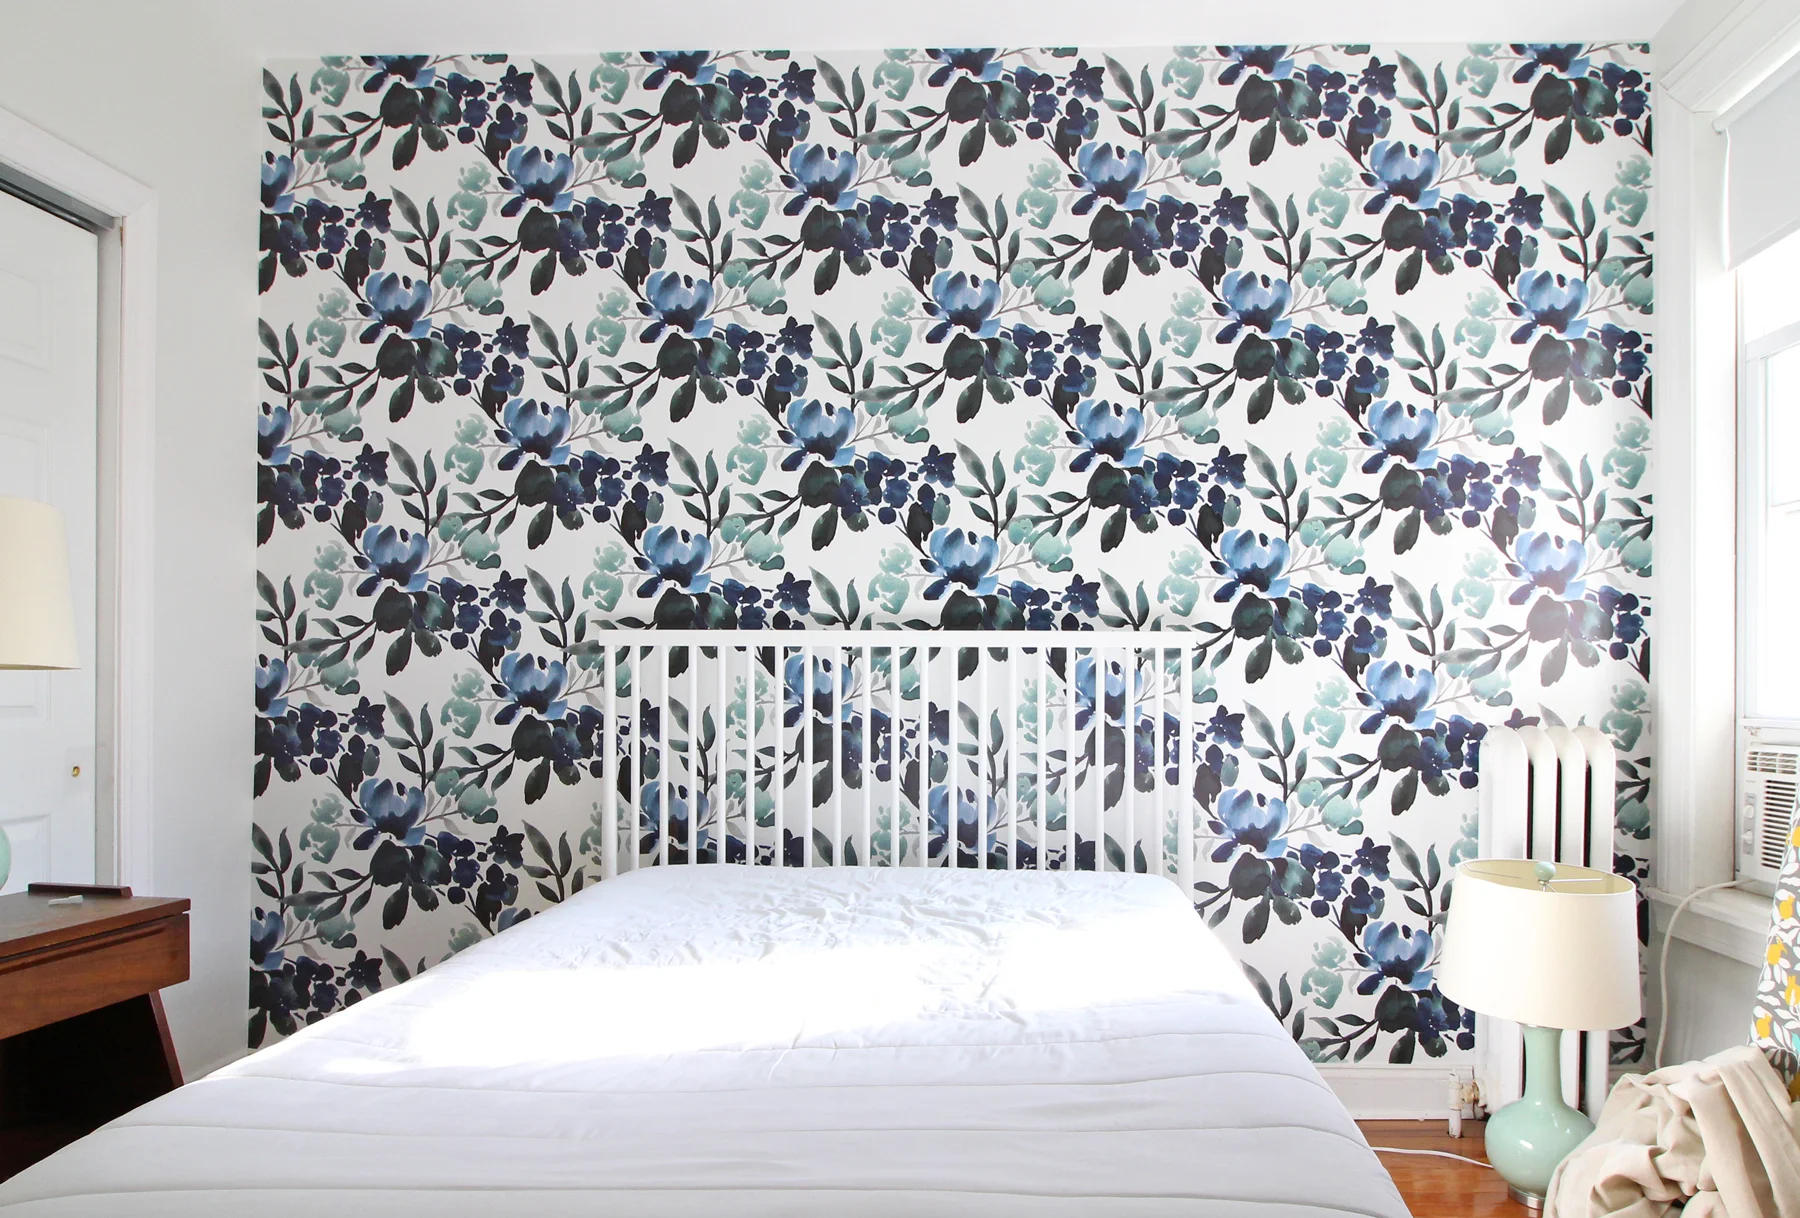
HUGE difference, right? And that white spindle bed just pops against it. I'm totally digging the contrast of the whimsical floral paired with the tailored lines of the bed.
Now here's the GIF!

It's kind of mesmerizing to watch! Anybody else with me on that?
Anyway, I'm thrilled with how the wallpaper turned out - every time I walk by the door to the guest bedroom I just want to stop and stare at it. Ok, let's be real, I do stop and stare at it. :)
Now onto the next order of business: the nightstands!
You can read all about the fun story behind these vintage mid-century beauties in last week's post, but the punchline is that I got them for free (yes!) and they need a little love. They're in great vintage condition considering their age, but the tops are struggling. See what I mean?

They both look about like this, which is a bummer, but not an insurmountable issue. Over the weekend, on Instagram stories, I shared these nightstands and posed the question about what I should do about the tops. In my mind, I had three options: try to refinish the veneer top to match, paint it white for a two-tone look, or have a piece of marble cut to fit the top.
The overwhelming response was to go the marble route, and I have to agree! I think it would be SO pretty and add an interesting detail to these bedside tables. What do you think?
Since I got them for free, I'm willing to put a little bit of money into them, so while having a piece of marble cut certainly isn't the cheapest option, I think it could be worth it. I'm currently in the process of getting some estimates from my local stone yards to see what it'll run me - I'm hoping to find a cheap remnant they can fabricate for me. (P.S. looking for similar mid-century nightstands, but don't want to do the vintage hunt? These Tate nightstands from Crate & Barrel are really similar to mine!)
So that's where we are in terms of progress for this week! Clearly I have some work to do, but it's totally manageable. Here's what's on the list to finish the room:
- Solve the nightstand conundrum (in progress)
- Sew up a curtain for the window (in progress)
- Hang the woven shade (done - will share next week)
- Sew a long lumbar pillow out of indigo fabric for the bed (done - will share next week)
- Hang the mirror
- Figure out art for the wall (I may be painting this - we'll see!)
- Hang wall hooks
- Finalize the bedding (almost done)
- Install ceiling light fixture
Ok! I think that wraps it up for this week's ORC post. I'll be back next week with more progress!In the meantime, be sure to follow along on IG Stories - I'll be sharing sneak peeks periodically over there!
Psst! Want to see more One Room Challenge spaces? Head over here to see the full list of participants!

A big thanks to the companies that are helping make this room transformation happen by sponsoring some of the products you'll be seeing:
Sweet Pea Wall Designs & their sister shop MUSE
*This post contains affiliate links, which means Mix & Match Design Company earns a small commission from your purchase at no cost to you.