
Coastal Modern Kitchen Refresh Reveal

Our kitchen project is DONE! I’ve been dreaming of this day since we bought our house three years ago and I am so thrilled with how everything turned out. I can’t wait to take you on a little photo tour. Let’s take a look at our refreshed coastal modern kitchen!
I’m sharing all the sources at the end, so if you’re looking for any specific info or links, take a look down there. I’m also happy to answer any questions about our project in the comments.
To sprinkle a little context on this, here’s what this kitchen looked like when we bought it. The only thing we had changed at this point was the pendant lighting - the ones you see here are the same ones we kept for the refresh. You can see more before photos here too if you’d like to see how far we’ve come.

The brown granite, off-white antiqued glaze cabinets, and stacked stone backsplash just weren’t our style. It felt pretty dated to me, even though it was new. 😬 We bided our time, schemed, and planned…and without changing the footprint or the cabinetry, we transformed it into this!

So what exactly did we do then?
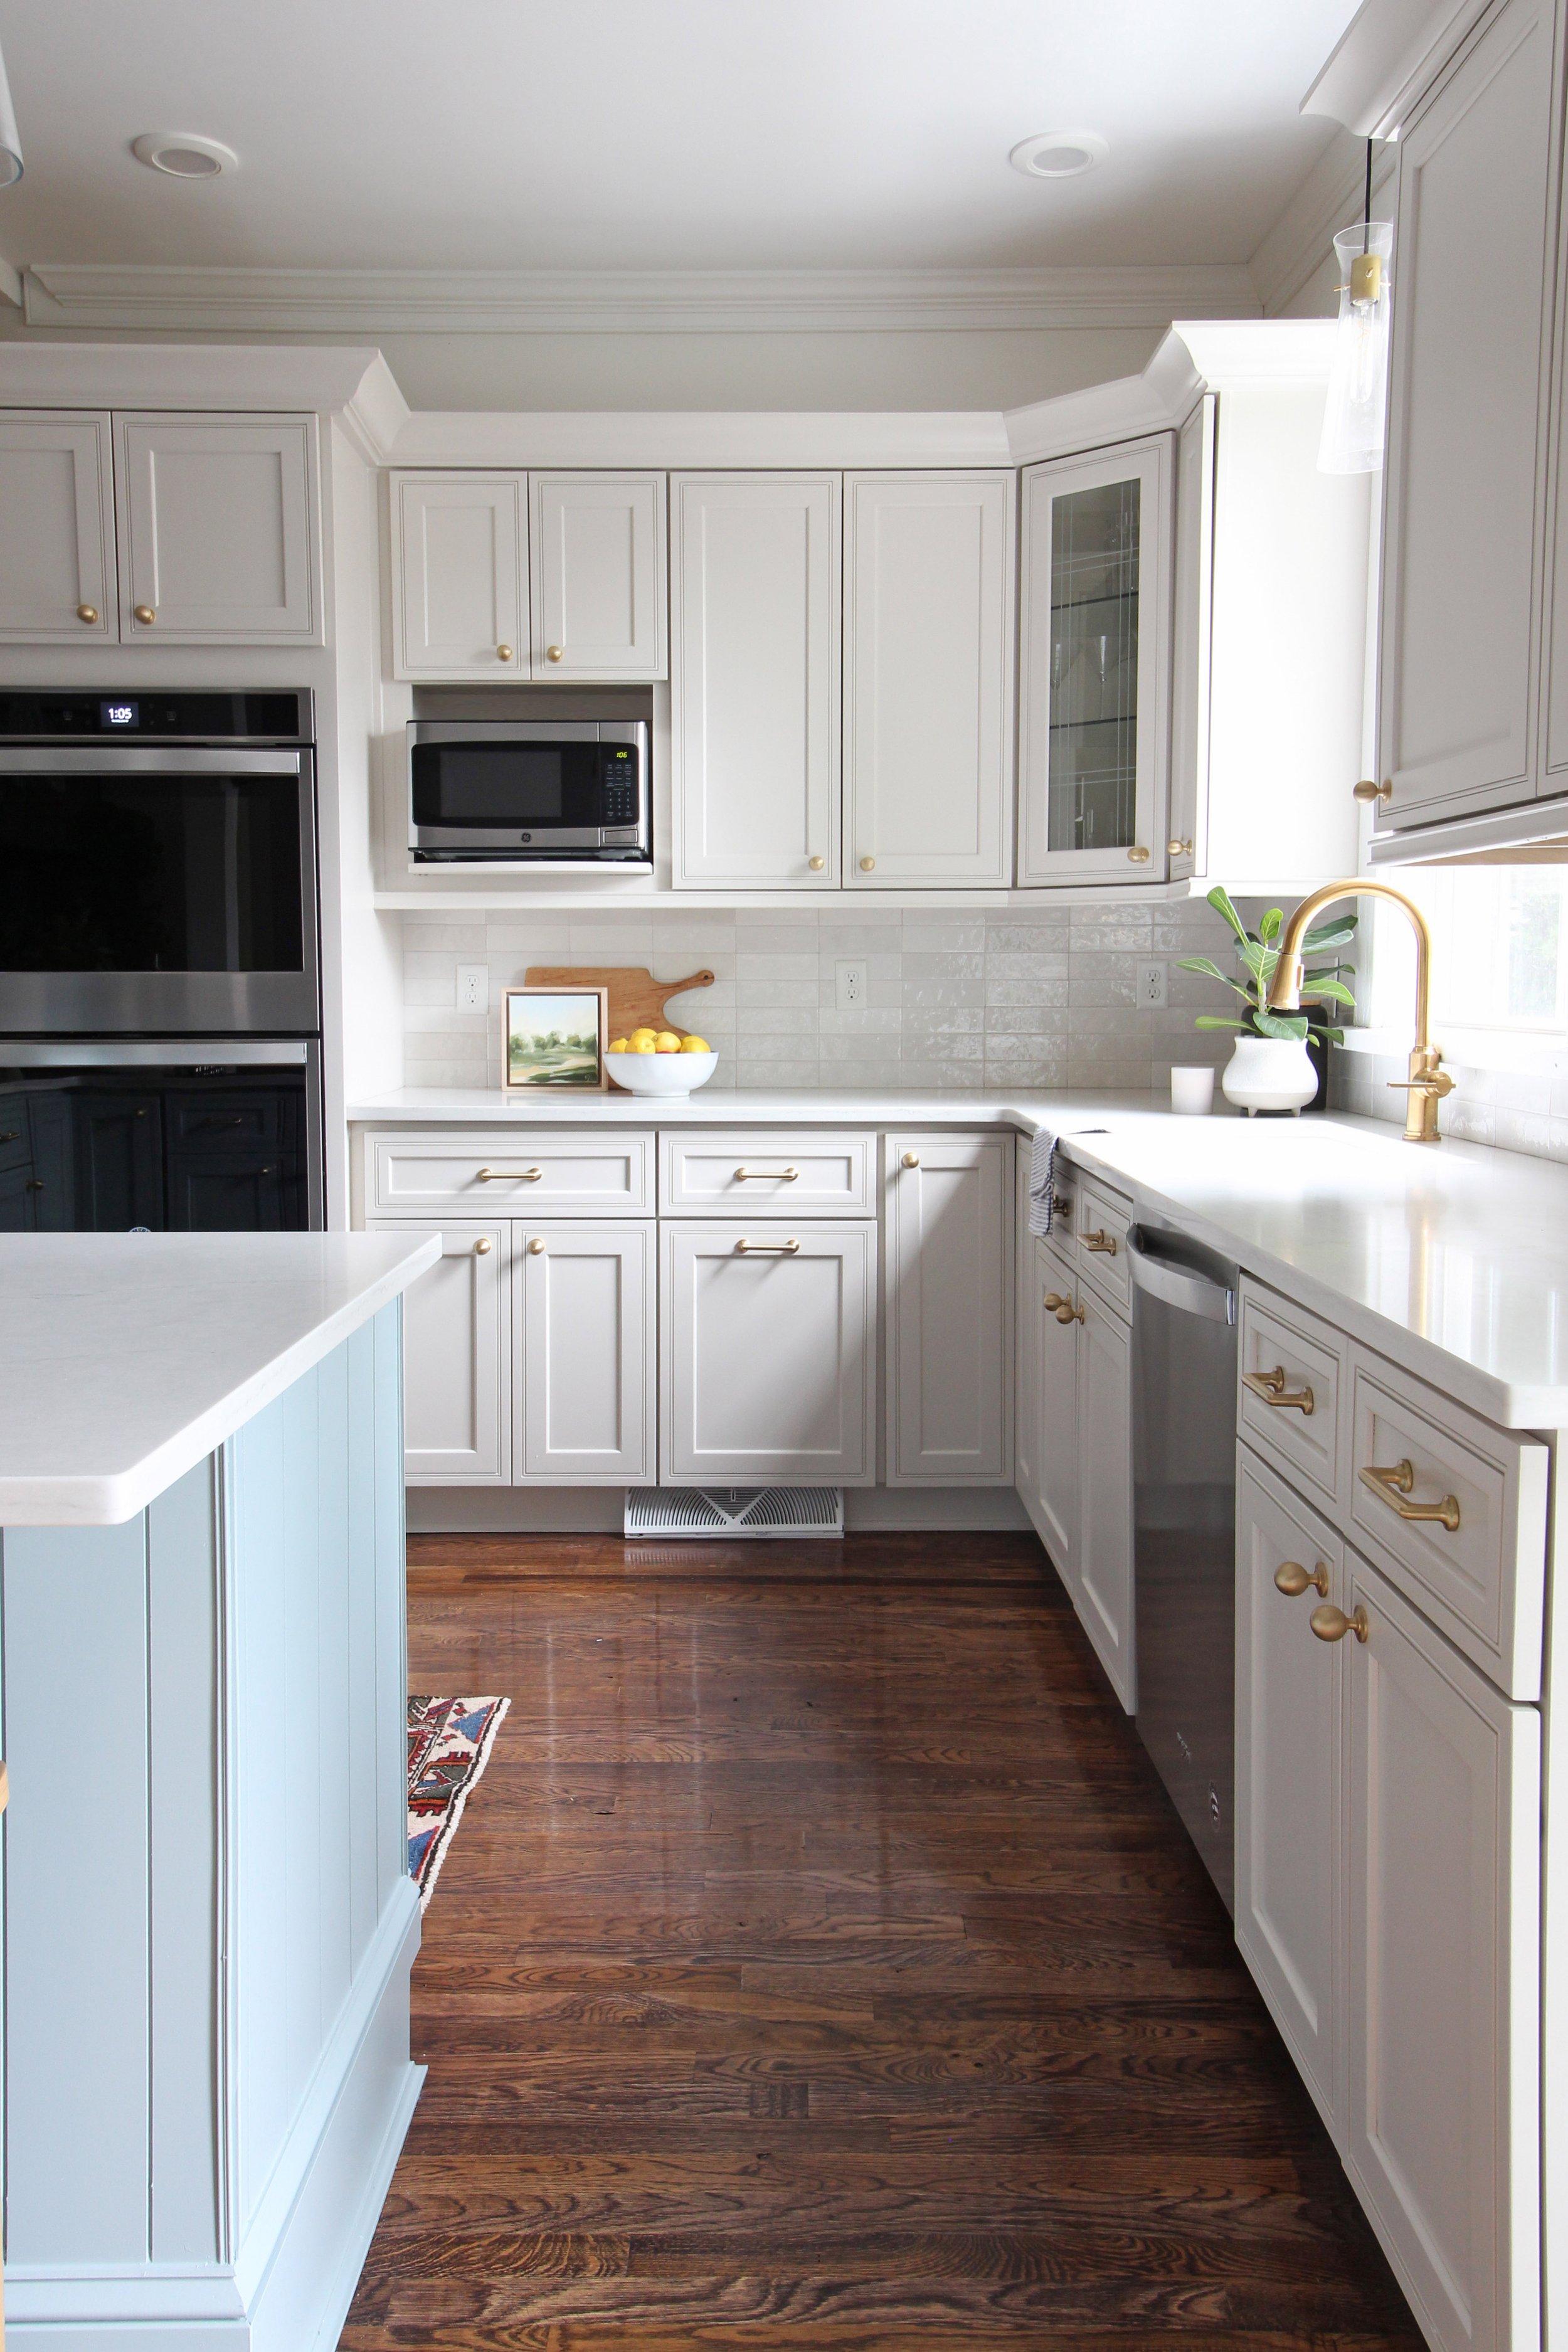
To give this kitchen a brand new look, we painted the cabinets, added vertical paneling (shiplap) to the island, changed the countertops to a marble-look quartz, swapped the hardware for brushed brass knobs and pulls, installed a subway tile backsplash, and put in a new sink and faucet. Just a few things, right? 😉
Painting our kitchen cabinets
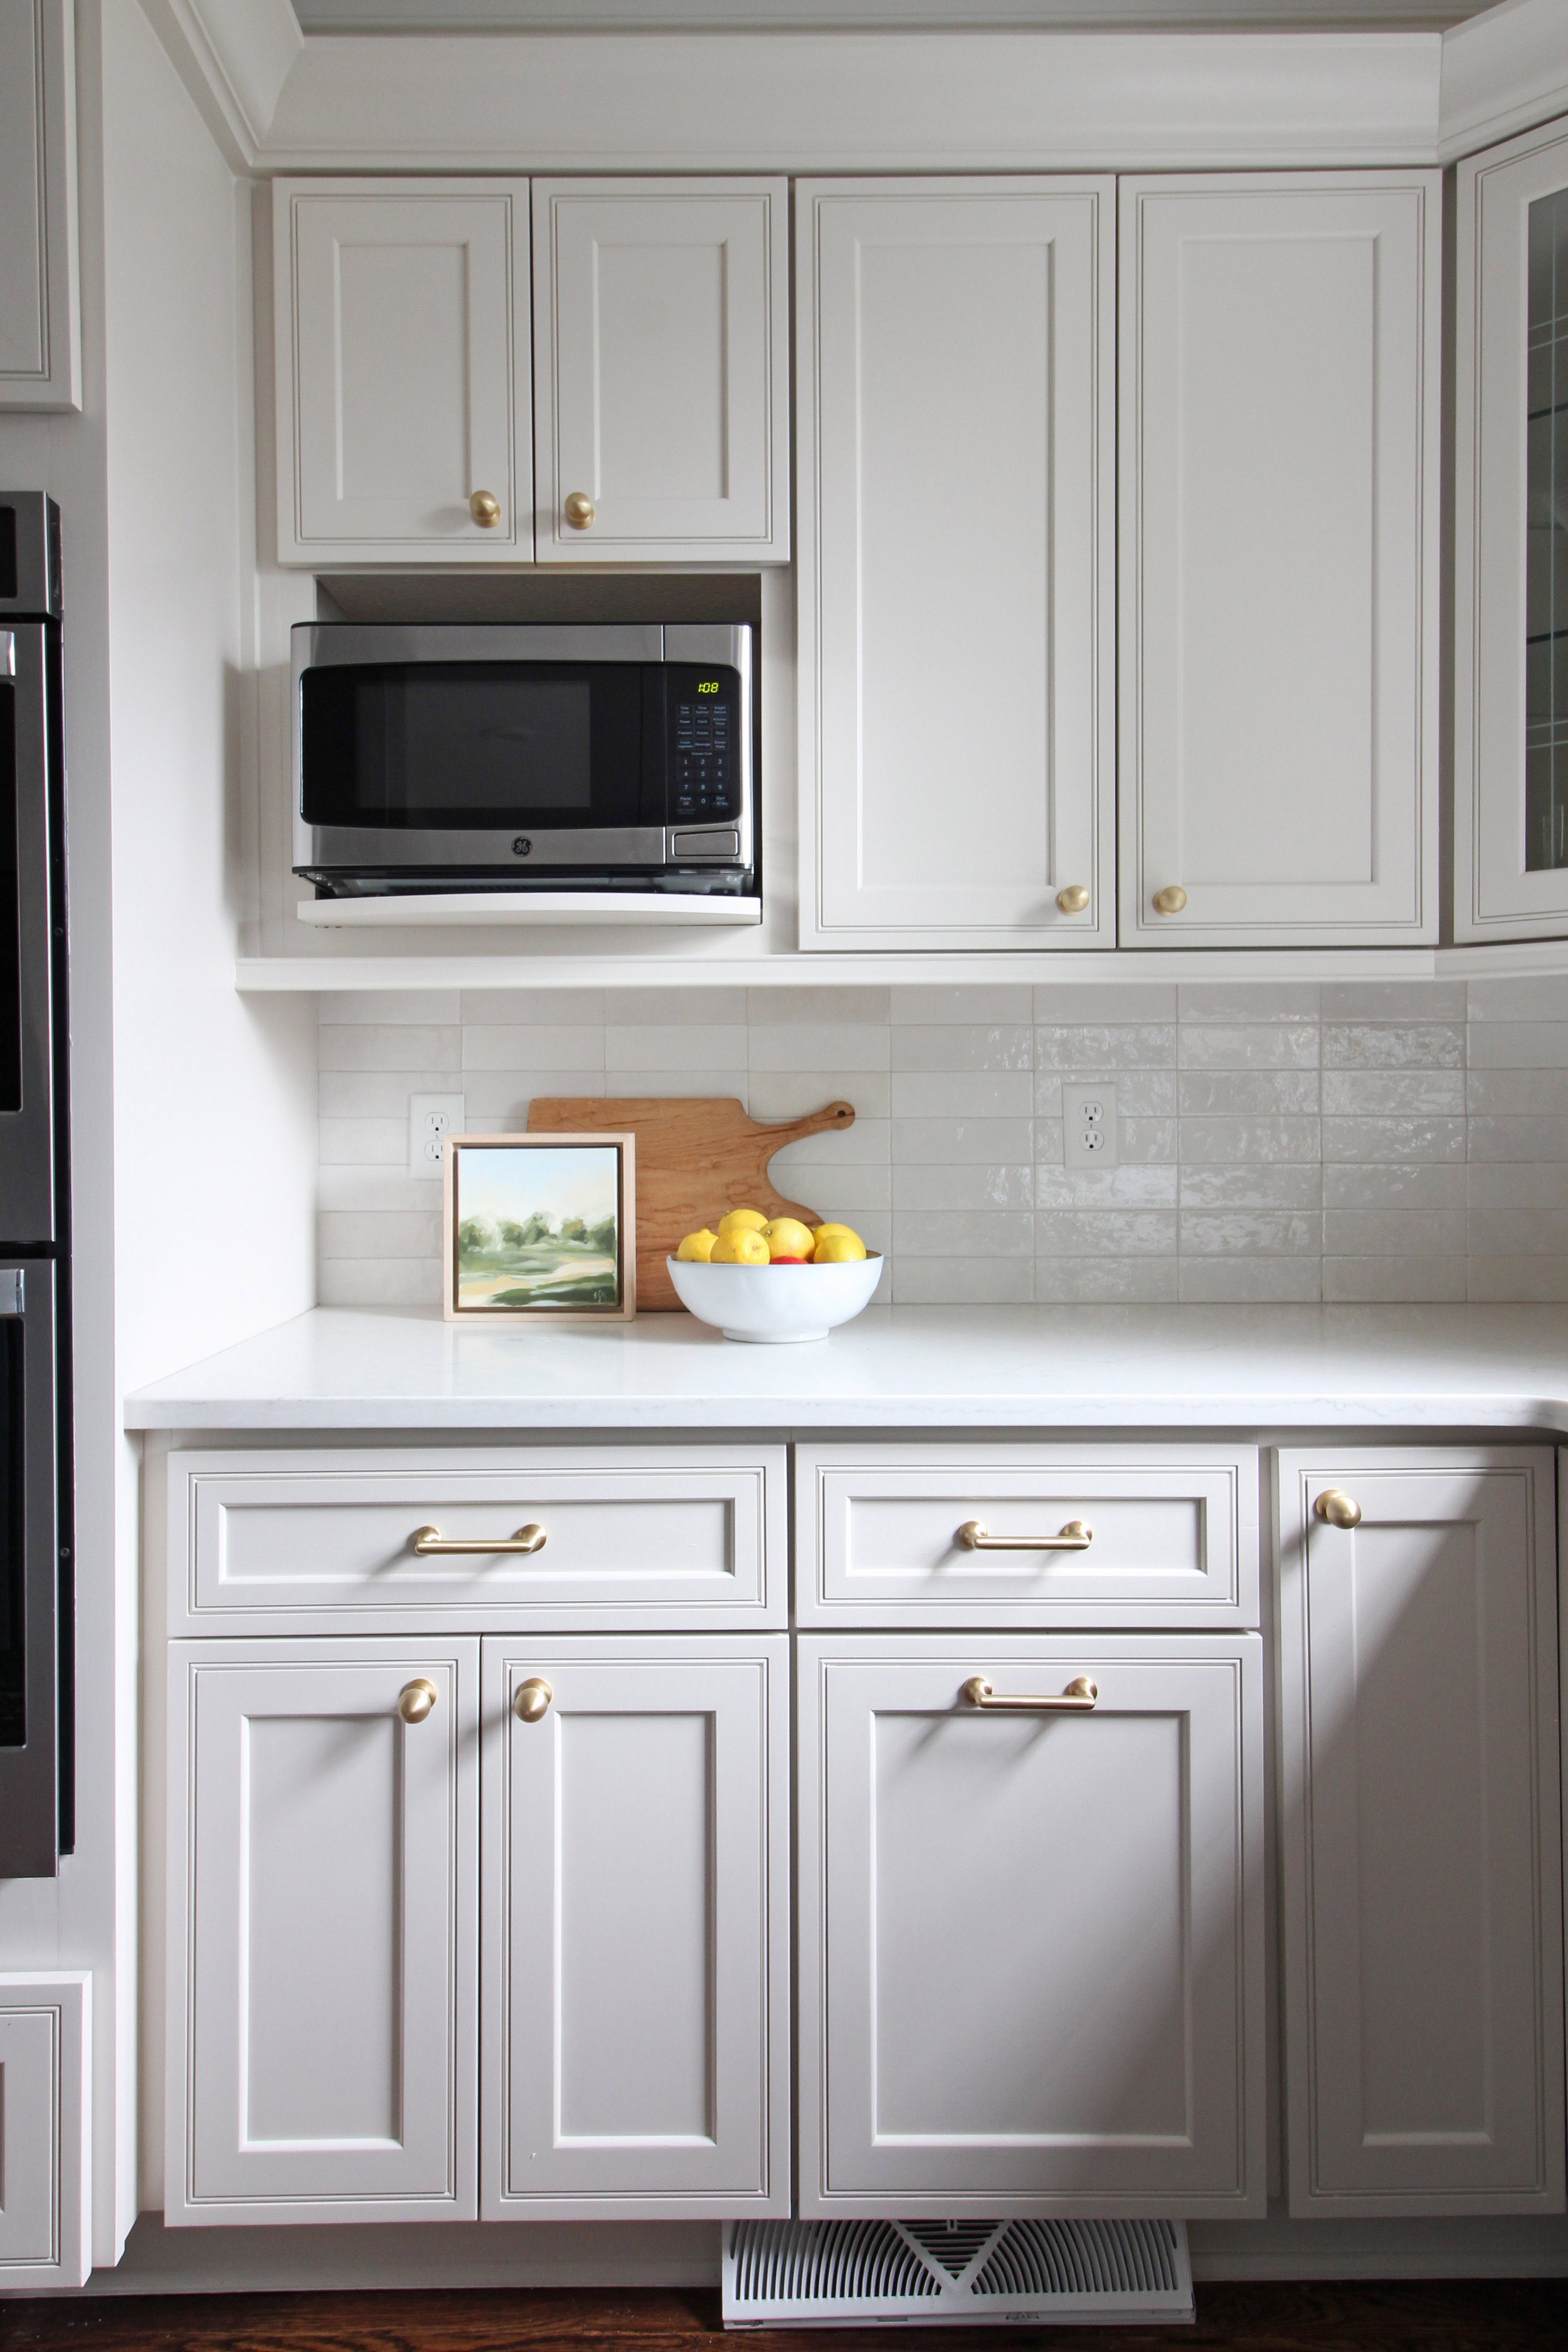
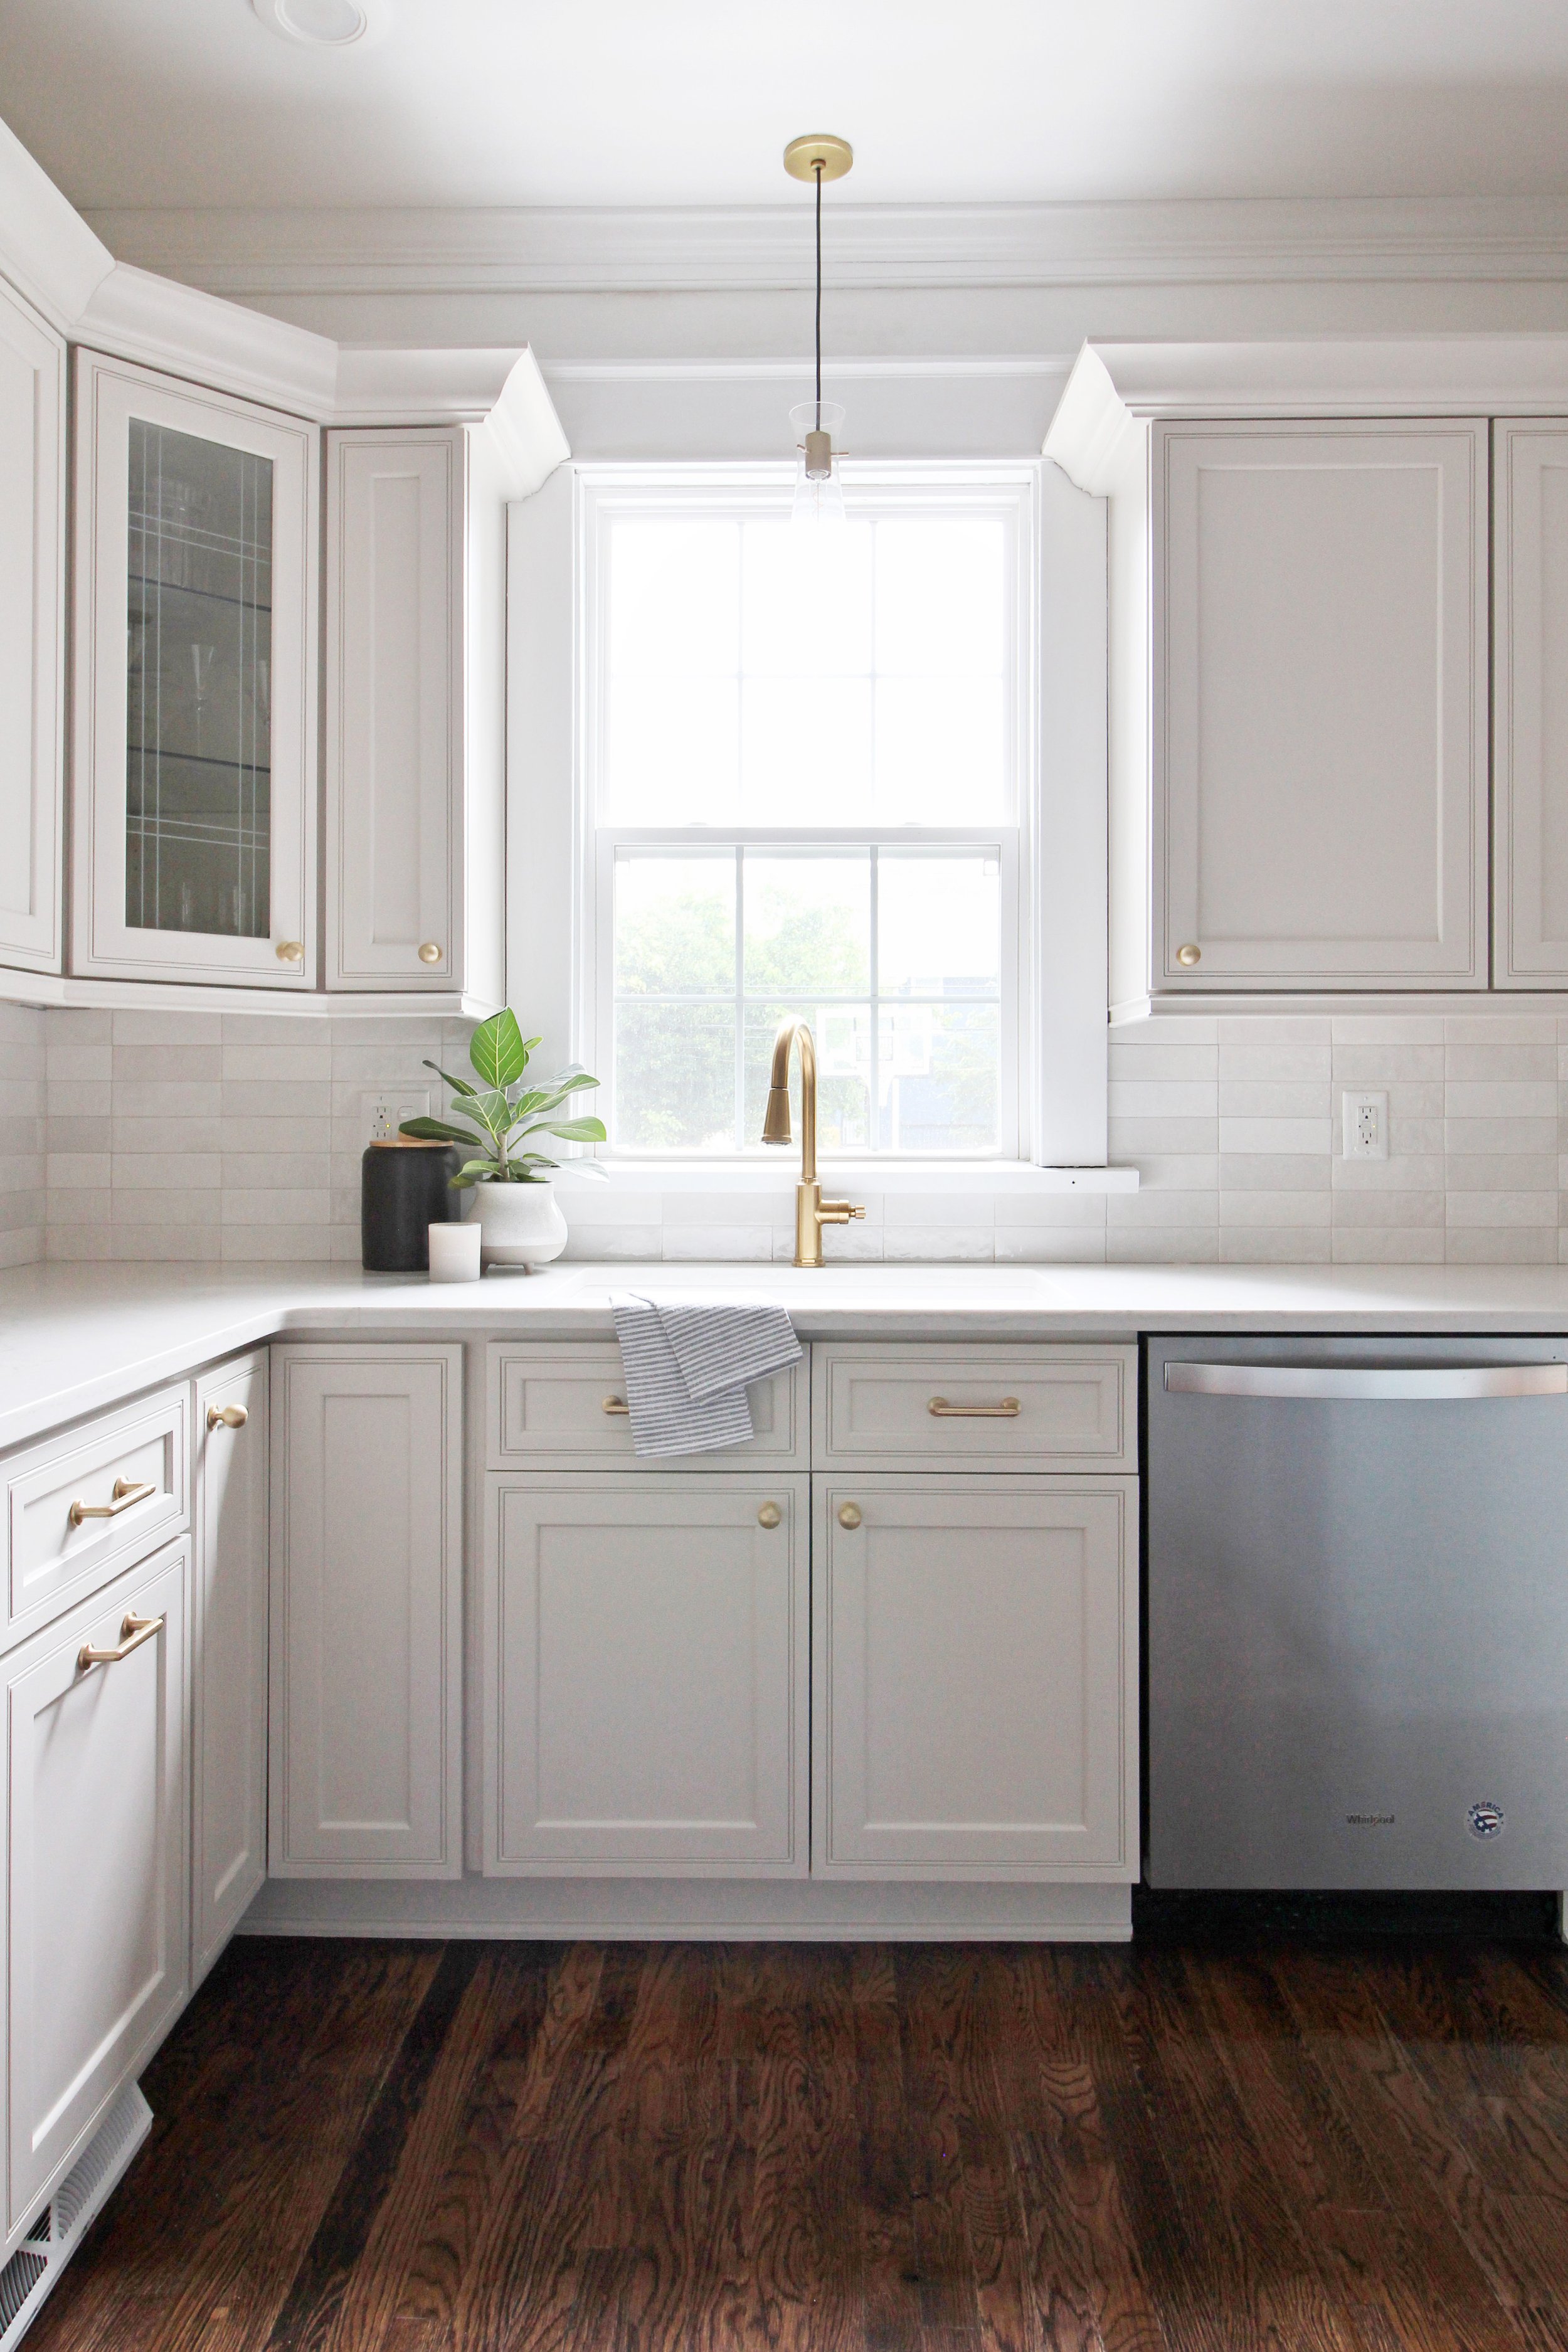
Let’s talk about the painted cabinets first since they’re probably the first thing you noticed! We worked with a local painting company (VA Fresh Painting if you’re in the Richmond, VA area) who transformed our cabinets from dated to beautiful with two paint colors: Benjamin Moore’s “Pale Oak” for the perimeter and Sherwin Williams “Breezy” for the island. They also did the carpentry to add the paneling and baseboards that match the rest of the house. The previous flippers had left the island pretty unfinished, so I was thrilled to add this detail - it adds so much interest!
Early in the planning phase, we had debated whether to paint or reface our cabinets (refacing means replacing the door and drawer fronts, but leaving the existing cabinet boxes), and ultimately landed on painting so I could get the exact colors I wanted. I actually liked the cabinet front profile, so I didn’t feel strongly about changing them. I’m so happy we kept the original door fronts - I now love the beaded detail, which bothered me so much before when it had the antique glazing.
The painters spent six (yes, six!) days giving our cabinets a makeover - they were so thorough and worked really hard to bring my vision to life. I figured I’d share that timeline in case you’re looking into painting your kitchen cabinets and are curious how long the process can take!
Adding satin brass hardware
That beautiful satin brass hardware is the icing on the cake for these cabinets. I was so grateful to partner with Signature Hardware for this project - they graciously gifted me the knobs, pulls, kitchen sink, and faucet.
I am so impressed with the quality of everything. The knobs and pulls are heavy, solid brass and you can tell that they’re going to stand up to the inevitable wear and tear that happens in a kitchen! We chose the 1.25” Rodino knobs and paired them with the 4” Belfast pulls. They’re a perfect pair!
When you’re choosing hardware for your kitchen, the easiest way to make sure the finishes match is to use the same brand. Brass in particular can vary a lot across different brands when it comes to tone and sheen. Going with the same manufacturer is key - this is a case where being matchy-matchy is a good thing!
Replacing granite with quartz countertops
The countertops were actually the first (and fastest!) part of the kitchen makeover. We chose a marble-look quartz called London Gray from a local fabricator here in Richmond. They manufacture their own quartz, so sadly it’s not widely available unless you’re in the Virginia area.
It’s gorgeous though. It has a warm gray-white base with some subtle gray veining to it. It blends so nicely with the Pale Oak paint as well as the varied white and gray tones in the backsplash. It’s a little hard to capture in photos, but I think this next view captures it pretty well.

Going with white Cloe tile for the backsplash
If you’ve been on Instagram or Pinterest at all in the past few years, you’ve likely seen this tile before! It’s the Cloe tile from Bedrosians. It’s popular for a reason - it has that perfect mix of handmade-meets-modern in varied shades of whites and grays. We decided on Bright White grout to go with it so that the colors of it blend softly together.
Gold faucet and white granite composite sink
Installing new countertops gave us the opportunity to swap out both our sink and faucet. This area of our kitchen was the least functional thanks to a broken faucet and a cheap double bowl stainless steel sink. My husband and I both work from home and we cook most meals here, so we spend a lot of time at this sink. It was high time to make it something we enjoyed using!
As I mentioned earlier, both the sink and faucet were gifted to us by Signature Hardware. We chose the Algren white granite composite sink and the Greyfield pull down faucet. I’ve never used that material for a sink - it’s really different from a ceramic or fireclay! It has a matte finish with a touch of texture and has more of a modern feel I’d say. It felt like a bit of a risk, but I’ve been really happy with it so far.
The faucet is a dream too. It has a nice, strong spray and the pull down feature is my favorite for reaching the far corners of the large sink to wash things down the drain. It’s also beautiful to look at - I love when function and beauty meet!

Counter stools
The folks who renovated our house added an addition to the back, and our kitchen spans both the old and new parts. That means we have an unfortunately placed support column right up against the overhang where our counter stools are. I might have tried to figure out a way to engineer it to avoid that, but hey, at least we can fit three stools in here!
We got these stools almost a year ago and I have been so pleased with them. They’re sturdy, all wood construction, and are the prettiest light wood tone. They’re also SUPER affordable. I love that they have a curved back that can keep kiddos contained. We have friends over regularly and the kids love sitting at the bar together. Since our dining room is just across the way, we’ve got lots of good seating options when we host.

Blue kitchen island
Since we have white walls everywhere, I was craving a little bit of color in this kitchen without going too bold. SW Breezy ended up being that perfect shade of gray-blue. It pairs so beautifully with brass, don’t you think?
I’m also so glad we went the extra mile and added the vertical paneling and baseboard molding to give it a more built-in look and to match our other trim in the house. Painted all in blue, this island is a true focal point in our home now.


So that’s our kitchen refresh, folks! I’m so thankful we got to do this project and give our kitchen a really fresh, modern coastal look. We plan on enjoying it for many years to come!

Sources
White Cloe Backsplash Tile
Quartz Countertops: London Gray from Panda Kitchen and Bath (local to Richmond, VA)
Perimeter Cabinet Paint Color: Benjamin Moore “Pale Oak”
Island Cabinet Paint Color: Sherwin Williams “Breezy”
Vintage Rug: Brick Alley Co. (local to Richmond, VA)